How to Remove Embroidery Without Damaging Your Clothes

By
Jean Chaney
Jean Chaney
Research Writer
Jean is the brains behind her fashion label. She's a whiz with a needle and thread, and has been sewing since she was old enough to hold a pair of scissors. Jean has always read more
reviewed
Reviewed By
Isabel Misner
Isabel Misner
Expert Consultant
A professional seamstress. Isabel has her own video blog where she shares her experience about all the aspects of sewing – from choosing suitable materials to step-by-step read more
Last updated: August 30, 2023
JustToSew is reader-supported. We may earn a commission through products purchased using links on this page. Learn more about our process here

Embroidery is a great way to add a personal touch to a garment but have you ever wondered how to remove embroidery stitching? If you’ve made a mistake in the design or just decided that you don’t like it anymore, removing embroidery from a garment or fabric is pretty simple. Let’s take a look.

How to remove embroidery with backing

How to Remove Embroidery Without Damaging Your Clothes

  1. Turn the garment inside out so you can access the back of the embroidery. It’s important to work from the back so you do not damage the front of the garment when removing the stitches.
  2. Tear or cut away any of the backing that you can. Some backing is designed to easily tear away, others need to be cut.
  3. Remove the stitches using a seam ripper. If you are working on hand embroidery, you will need to tear every stitch. If the item is machine embroidered, you can often just locate the white bobbin thread and remove it. Most of the stitches will unravel when the bobbin thread is removed.
  4. Turn to the right side of the embroidery and pull out the stitches that you just cut from the back. Use tweezers to remove any small pieces of thread.
  5. Repeat until all of the stitches are removed.
  6. Once you have removed the embroidery, the backing should easily peel away from the fabric.
  • If the garment you’re working with has fused backing, removing it can be tricky as it is meant to be permanent. After you have removed the stitches, hold a steam iron over the fused fabric to try to soften the adhesive. While the fabric is still warm but cool enough to touch without burning your finger, attempt to pull the backing from the fabric. If you still cannot pull off the backing, place it under the steam iron again. Repeat this process until you can peel away the backing.
  • Removing any remaining adhesive can be tricky but it is possible. Take a lightweight scrap of fabric and moisten it slightly. Place the fabric over the adhesive, run a hot iron over it, and then quickly peel the fabric scrap off. Repeat using a clean piece of fabric until any residue is gone.


How to remove embroidery without a seam ripper

If you’re wondering how to remove embroidery without a seam ripper, there are plenty of tools you can use to get the job done. Some of the most common are cuticle scissors, a utility knife, or an ordinary razor blade.

  1. Make sure you are working on the back of the garment.
  2. Use the razor or scissors to cut through the stitches on the wrong side of the fabric. Work a few inches at a time. If the piece you are working on is hand embroidered, you will need to tear every stitch. For machine embroidery, you usually just find and tear the white bobbin thread. Most of the stitches will unravel when the bobbin thread is removed.
  3. From the right side of the fabric, pull out the stitches that you cut from the back. Use tweezers to get any small pieces of thread left behind. Repeat until all of the thread is removed.

You can also use a disposable razor in a pinch. Here’s how to remove embroidery with a razor:

  1. Again, work from the wrong side of the embroidery. This is particularly important when using a disposable razor because this method is not as precise as some of the others and you want to be sure you do not damage the fabric.
  2. Use the razor to shave down the stitches, running the blades over the top of the stitches.
  3. From the right side of the fabric, pull out the stitches that you just cut from the back.
  4. Repeat until all the thread is removed.

How to remove embroidery from clothes

The process for removing embroidery from clothing is the same no matter what the material. The only difference is that some fabrics may have backing while others most likely won’t.

How to Remove Embroidery Without Damaging Your Clothes

Stretchy fabrics like knits and teeshirts and some lightweight fabrics are likely to have a stabilizer or backing underneath the embroidery. This is to prevent the design from stretching and getting distorted. Thin fabrics or light-colored fabrics often require backing, too, so that the back of the work doesn’t show through to the front, like a black floss on with fabric. Fabrics like linen that have a loose weave with a lot of space between the fibers also commonly have a backing to keep the embroidery from shifting.

If the clothing you’re working on has a backing, take a look at the directions for how to remove embroidery with backing to learn more.

How to remove embroidery from a jacket

  1. Turn the garment inside out so you can access the back of the embroidery. This can be tricky depending on where the embroidery is located. For example, it’s easy to get to the underside of embroidery on the back of the jacket while embroidery on the sleeves or pockets is a little more difficult.
  2. Remove the stitches using a seam ripper or other tool. With hand embroidery, you will have to remove every stitch. With machine embroidery, you can usually just find the white bobbin thread and cut it. The stitches should unravel when the bobbin thread is removed.
  3. Turn to the right side of the embroidery and pull out the stitches that you just cut from the back. Use tweezers to remove any small pieces of thread.
  4. Repeat until all of the stitches are removed.

 How to remove embroidery from a shirt

  1. Turn the garment inside out so you can access the back of the embroidery. If you’re working with a button-down shirt, this can be difficult if the embroidery is on the pockets or sleeves. With short sleeve shorts and tees, the process is a little more straightforward.
  2. Remove the stitches using a seam ripper or other tool. With hand embroidery, you will have to remove every stitch. With machine embroidery, you can usually just find the white bobbin thread and cut it. The stitches should unravel when the bobbin thread is removed.
  3. Turn to the right side of the embroidery and pull out the stitches that you just cut from the back. Use tweezers to remove any small pieces of thread.
  4. Repeat until all of the stitches are removed.

How to fade stitch marks

Once you remove the embroidery from a garment, it takes a bit of work to get the leftover holes to fade, especially is the embroidery has been there for a long time. Here is one method for how to fade stitch marks that should work on any piece of clothing that you can iron.
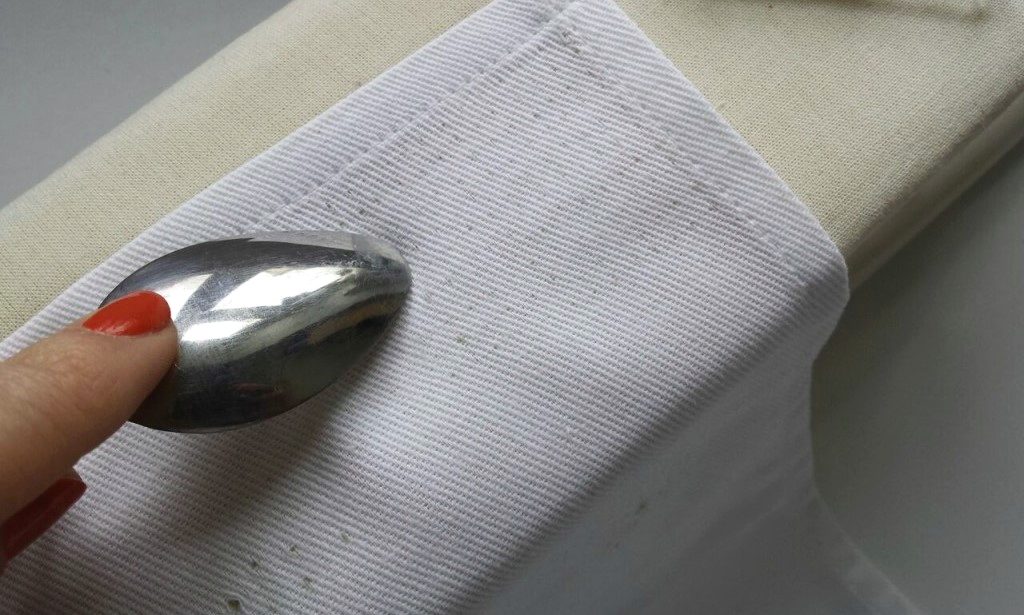
  1. Iron over the embroidery holes using the iron setting that is appropriate for the material.
  2. Move your fingernail across the holes horizontally two or three times to attempt to move the fibers in the fabric back into place. You can use the tip of a spoon instead of your fingernail if necessary.
  3. Run your fingernail or the tip of the spoon vertically over the hole to move the threads back into place.
  4. Press the area with the iron again.
  5. Repeat the process, being sure to scrape over the holes both vertically and horizontally.
  6. Flip the fabric over and repeat the process on the backside of the garment. You may need to repeat the process several times.

How to Remove Embroidery Without Damaging Your Clothes

How to remove embroidery from a backpack

Backpacks are typically made of stronger, more durable material so the process is usually easier since you don’t have to worry about damaging anything too delicate. The approach for how to remove embroidery from a backpack is generally the same.

  1. Turn the backpack inside out so you can access the back of the embroidery. If the embroidery is on one of the pockets, it can be difficult to get to the back. In this case, since the fabric is generally a little tougher, you can work from the front, being very careful not to snag the material.
  2. Remove the stitches using a seam ripper or other tool.
  3. Turn to the right side of the embroidery and pull out the stitches that you just cut from the back. If you’re working from the front, it may be a little harder to pull out the stitches. You may also try removing them from the opposite side if possible. Use tweezers to remove any small pieces of thread.
  4. Repeat until all of the stitches are removed.

How to remove embroidery from a hat

Removing embroidery from hats is pretty straightforward. Most baseball caps and other basic designs can easily be turned inside out to give you the access you need.

  1. Turn the hat inside out so you can access the back of the embroidery.
  2. Remove the stitches using a seam ripper or other tool. With hand embroidery, you will have to remove every stitch. With machine embroidery, you can usually just find the white bobbin thread and cut it. The stitches should unravel when the bobbin thread is removed.
  3. Turn to the right side of the embroidery and pull out the stitches that you just cut from the back. Use tweezers to remove any small pieces of thread.
  4. Repeat until all of the stitches are removed.

Conclusion

If you’ve been wondering how to remove embroidery, now you know! It’s actually not as difficult as you might have thought. All you need are the right tools, some time, and a little bit of patience.
Leave a comment

Your email address will not be published. Required fields are marked *

X