How to Make a Flare Pants Pattern in 4 Steps

Check out the step-by-step instructions below and learn how to make a pattern without any hassle!
By
Jean Chaney
Jean Chaney
Research Writer
Jean is the brains behind her fashion label. She's a whiz with a needle and thread, and has been sewing since she was old enough to hold a pair of scissors. Jean has always read more
reviewed
Reviewed By
Isabel Misner
Isabel Misner
Expert Consultant
A professional seamstress. Isabel has her own video blog where she shares her experience about all the aspects of sewing – from choosing suitable materials to step-by-step read more
Last updated: August 10, 2023
JustToSew is reader-supported. We may earn a commission through products purchased using links on this page. Learn more about our process here

Fashion in the 80s was all about flared pants. You would see so many different types of flared pants during this era. Later, the fashion trend slowly transitioned into straight pants and skinny jeans. While skinny jeans dominated the fashion trends for so long, we are seeing a comeback of numerous other pant styles, including flared pants. Different types and styles of flared pants are now being worn around the country.

To add your own flair to this style of pants, we recommend stitching them on your own. Before you start to freak out about how you may stitch flare pants on your own, we are here to help you with a step-by-step guide on how to make your own flare pant pattern. All you need is some fabric, this guide, and some time for stitching, and you will end up with your own flare pants. Let’s get started!

Measurements You Need to Take

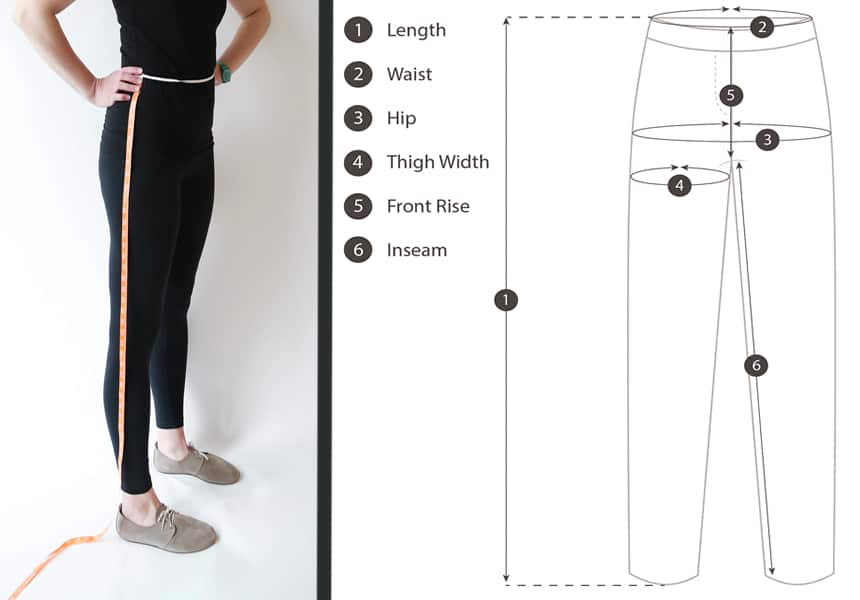
Before you start working on the flare pants, you will need precise measurements for a more customized fit. Here is how you can measure the areas correctly:

  • Length: The first thing you need to do is measure the length of your legs from the waist down. The length of your flare pants depends on you. You can either opt for cropped, or long-length pants. To take the measurement, place your measuring tape at your waist. Your waist is the slimmest area on your torso. Take your measuring tape and then go all the way down to the place where you want your pants to end.

If you are finding difficulty in getting this measurement, then ask a friend to help you with it.

  • Waist: Next, you will be measuring your waist. Luckily, this area is extremely easy to measure. After identifying your waist, take your measuring tape and loop it all around. While measuring, make sure that you remain relaxed so that you get accurate measurements.
  • Front rise: This is the area from your crotch to your waistband. To measure the front rise, take your measuring tape and place it between your legs. Then, starting from the waistband at the front, take the measuring tape all the way to the backside of your waistband. The measurement will give you your full rise length. Then, divide this measurement into two and you will get the length of your front rise.
  • Hip: To measure the hips, wrap the measuring tape around the fullest area of your hips. Usually, this area lies about 1–1.5 inches below your zipper.
  • Thighs: Most people find it confusing about which part of the thigh should you measure. For stitching purposes, you need to measure your thigh at its highest point. This area usually lies directly below your crotch area. Loop your measuring tape around your leg in this area and note down the measurement.
  • Knee: Similar to thighs, loop your measuring tape around the knee. While measuring, make sure that your knees are slightly flexed so that you get accurate measurements.
  • Inseam: To measure the inseam, start by placing your measuring tape next to the crotch area and then extend it till where you want your pant length to end.

Note down all the measurements on a piece of paper. Now we move on to make the flare pant pattern.

How to Make a Flare Pants Pattern in 4 Steps

Making a Flare Pants Pattern

Making a flare pants pattern might seem like a difficult task to you, but luckily, we are here to guide you through every detail and step.

What You Will Need

To make the flare pant pattern, you would require some tools and material. Here is a list of all the things you would need:

  • Appropriate fabric: For the pants, select your material of choice. It can be anything ranging from denim to cotton, and so on.
  • Sewing threads: To stitch the pants, you would need thread that would ideally match your fabrics color. Singer sewing kit contains some very high-quality sewing threads that you can consider.
  • Elastic/zipper: For the waist band, you can either go for elastic or go with a zipper. For invisible zippers, you can click
  • Sewing pins: These will help you hold different materials while drafting the pattern and stitching.
  • Scissors: This is pretty self-explanatory, but you will also be needing some sharp scissors for cutting out the pattern and the fabric. Be careful while using the scissors though!
  • Pattern Trusted Source Pattern (sewing) - Wikipedia en.wikipedia.org making paper: This paper will be used for the designing and tracing of the flare pant pattern.
  • Sewing machine: Last but not least, you will be needing a sewing machine to stitch all the pieces together. Here are some of the best sewing machines for making clothes.

Step-by-Step Guide

Now that you have gathered all the material, let’s move on to the actual part which is drafting the flare pants pattern and stitching it together. Here is how:

Step 1: To draw the pattern, take your pattern making paper and place it on a flat surface. Sewing tables would be ideal for this purpose. Using a pencil, start drawing a line from the hip at the outseam/length. Taper the line slowly towards the knee section. Usually, we taper it in at about a quarter inch.

How to Make a Flare Pants Pattern in 4 Steps

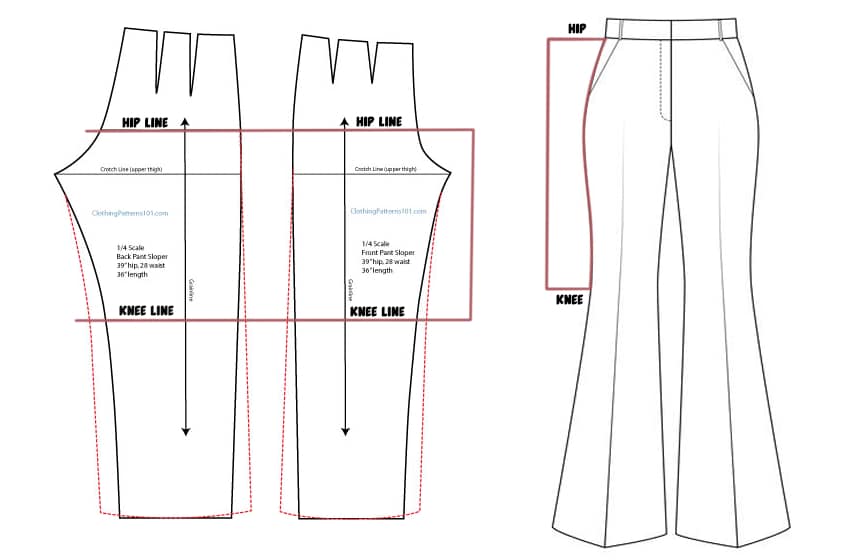
Step 2: After this, you start adding the flare from the knee portion, depending on the size of the flare that you want. For a boot cut leg, add half an inch at the side hems and for a bell bottom, add 1.5 inches for the extra flare.

Step 3: Then, for the inseam portion, we start from the knee line and add the same amount of flare to this line. Make sure that your lines are smooth. You can even add different kinds of variation to your flared pants.

How to Make a Flare Pants Pattern in 4 Steps

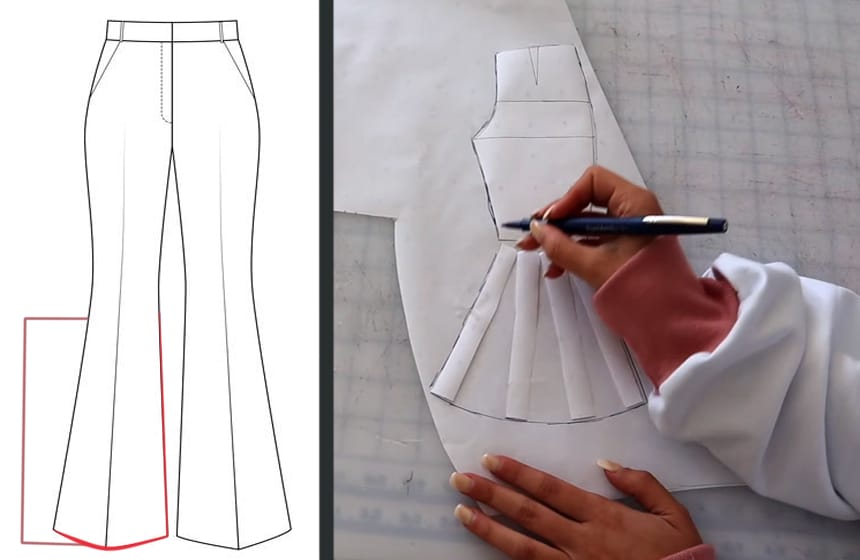
Step 4: After completing the pattern, pin it to the fabric and start cutting it. Once you get all the pieces together, stitch them accordingly. Your flare pants are now ready to wear!

Types and Styles of Flare Pants

When it comes to flare pants, there are many different variations. Here are some of the few:

  1. Wide-legged flare: The flare for these pants start at the thigh. This style of wide legged flare has been popular since the 70s.
  2. Bell-bottoms: Trusted Source Bell-bottoms - Wikipedia en.wikipedia.org Known for their bell-like shape, these pants start their flare from below the knee.
  3. Bootcut flare: These pants start from the knee as well; however, they have less flare as compared to the bell-bottoms.

Final Thoughts

Flared pants have been in fashion for many years. You can style these types of pants in any way that you want. And what better way to wear these pants than to design them and customize them according to your own liking? With our flare pant pattern, you can design your own pants with a more customized fit.

While you can buy different patterns online, there is nothing like making your own. If you follow the instructions mentioned above, you will end up with a great pair of pants!

References

1.
Pattern (sewing) - Wikipedia
2.
Bell-bottoms - Wikipedia
Leave a comment

Your email address will not be published. Required fields are marked *

X