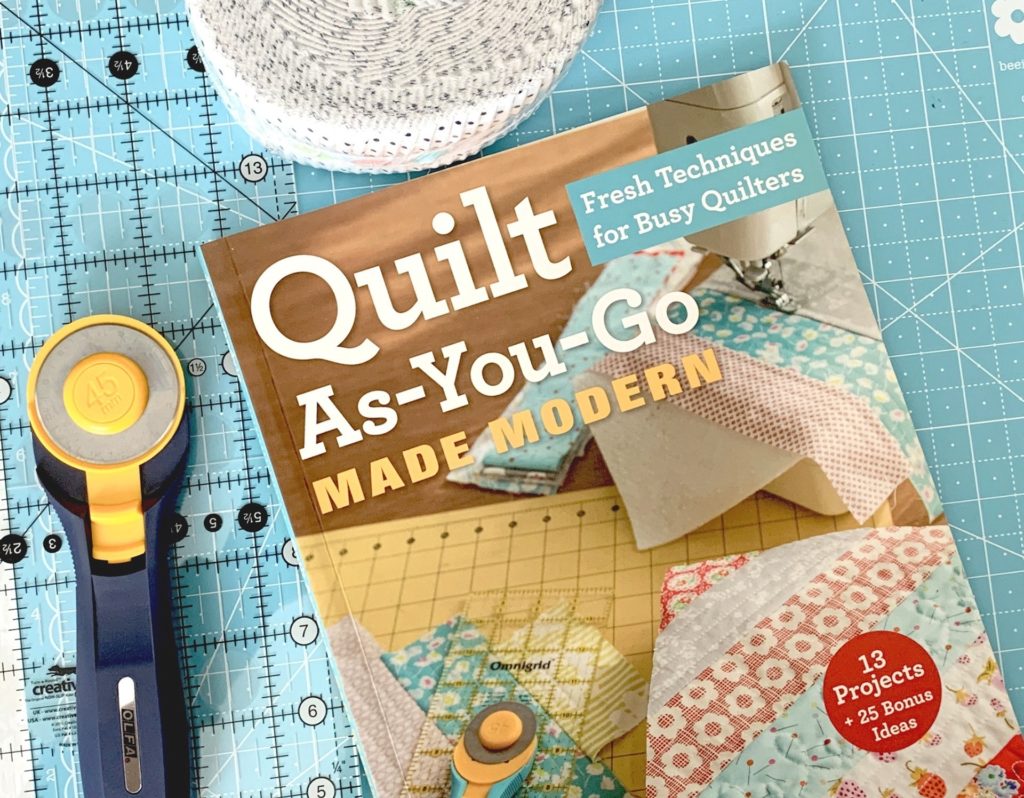
If you enjoy sewing, then you have to agree with us that making handmade garments is an extremely fun and calming activity. Trusted Source The calming effects of sewing can help people express and heal themselves | Life and style | The Guardian How absorbing your concentration in needlework relieves inner turmoil. By Clare Hunter www.theguardian.com You get to pour out your creativity into an exciting project that knows no limit. There’s, however, one challenge, especially when you’re just starting out: achieving a beautiful professional finish.
This is where bias tape comes into play. It allows you to add a pop of detail to your garments and finish the armholes and necklines perfectly. What exactly is bias tape, and why do you need it? How should you use a bias tape? Due to the wide application of bias tape, sewists are sometimes confused about the best way to use this accessory.
We’ve compiled a quick guide to this sewing tool, including how you can make a DIY bias tape.
 To understand bias tape, you have to first know what a bias is. When you purchase fabric, it usually has 2 machine-finished edges (selvages). These edges help you find straight edges on your fabric and are usually parallel to each other. If you pay close attention to the woven fabric, you’ll notice that the interlocking pieces of fabric or grain lines always run perpendicular and parallel to the selvage edge.
The bias runs at a 45-degree angle across the fabric. Start by placing your piece of fabric on a flat surface and then cut it off at a 90-degree angle using the selvage edge as your starting point. If you fold this cut edge diagonally so that it lines up with the selvage edge, it will form a diagonal fold that’s 45 degrees. So, when you cut along this fold, you’ll be cutting along the bias line. The fabric cut on this line is usually elastic, which is a critical trait of the bias tape.
The bias tape is a piece of fabric used to create clean edges and bind sewing projects so as to cover the raw edges.
This type of bias tape is single-fold and is great for binding the raw edges of lightweight materials. Since it is single-wide, it adds no weight to your garment. Single-fold bias tape is perfect for finishing projects where the bias tape shouldn’t show on the outside, e.g., necklines and armholes. This is because both places are curved and need materials to go around the curves.
Based on reviews, the IubuFigo 12mm 1/2″ Bias Tape is one of the best single-fold bias tapes in the market. It comes in a variety of colors to ensure you find the one that fits your project and is half an inch wide. This bias tape is made from polyester and can be used for hemming, piping, binding, and sewing. It comes in a mix of 10 colors, each 18 yards long, and is of high quality.
This type of bias tape is twice the size of the single-fold bias tape. It is mostly used for thick projects and garments, e.g., the edge of a quilted blanket. While you can still use the double-fold bias tape for necklines and hems, they will have a thicker appearance which not only adds weight to your garment but also stands out.
Based on popular opinion, the Tewadoo Double Fold Bias Tape is a top pick among many sewists. It is made from high-quality polyester, is soft, and doesn’t shrink after being washed. This double-fold bias tape is 55 yards long, sturdy, durable, and doesn’t require ironing. It also has a wide range of applications, including binding, trimming & sewing straight and curved edges. You can use it on multiple fabric types.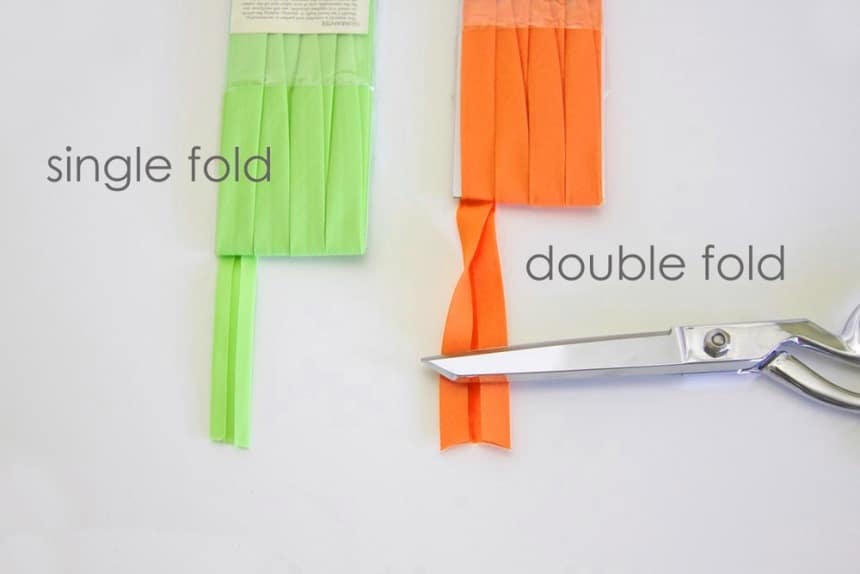
Bias binding has limitless possibilities and can save you a lot of money in the long run. You can use it for decorative purposes on quilting projects, encase raw edges, or bind necklines and armholes. The best part is that it’s relatively easy to make bias tape, and you don’t need any specialized equipment.
While you could buy ready-made bias tape, if you’d like your bias to match the fabric of the garment you’re working on, you’ll have to make it from scratch.
Here’s a step-by-step guide on how to make bias tape without a bias tape maker.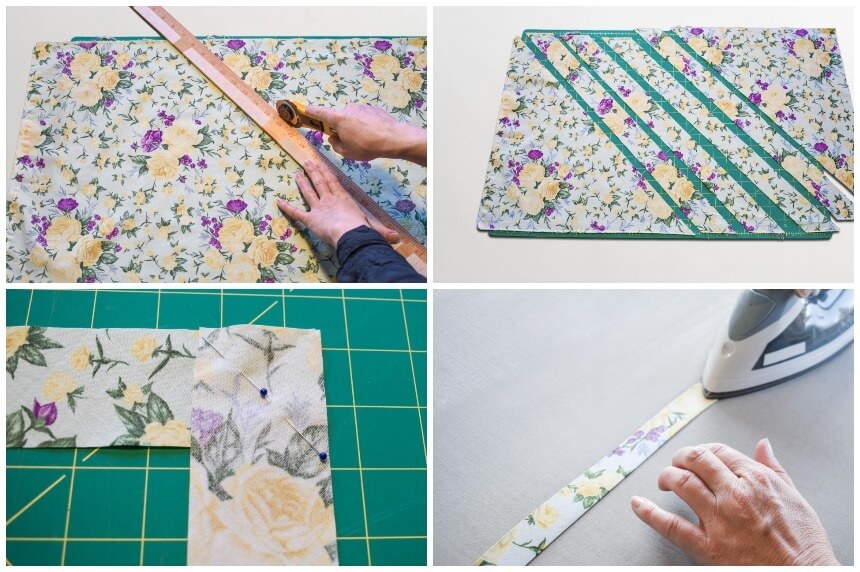
Step 1: Find the bias. It is always 45 degrees from the selvage and is the stretchiest part of your fabric.
Step 2: Cut strips along the bias line. If you’re using a bias tape maker, ensure the fabric is double the width of the tool. For instance, if your bias maker is 0.5 inches, the strip should be 1 inch wide.
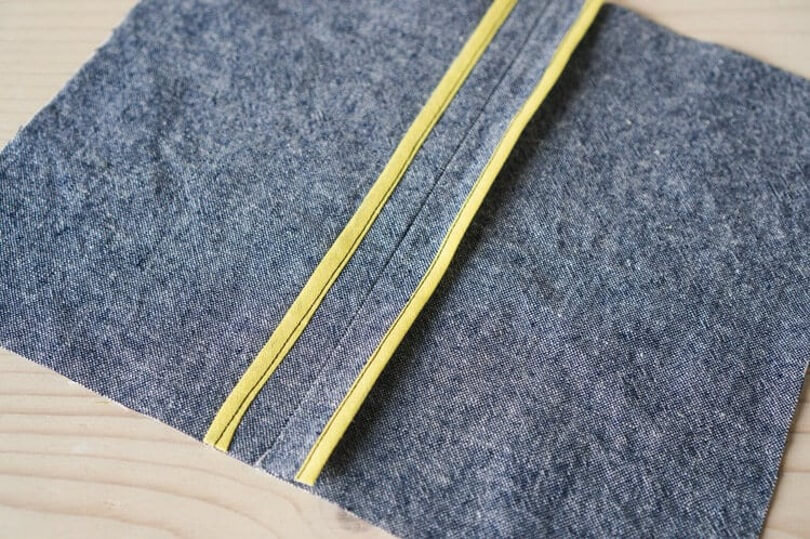
Step 3: Attach the bias strips. Take 2 strips whose ends are facing in a similar direction and join them at a 90-degree angle so that the edge of the bottom right corner is matching the one at the top left corner.
Step 4: Press open the seams and ensure you trim the raw edges that are sticking out for a lovely finish.
Once you have joined all the bias strips, you can turn them into tape using a bias maker.
If you already have a bias tape maker, the process is a bit simpler.
You’ll need:
To make the bias tape: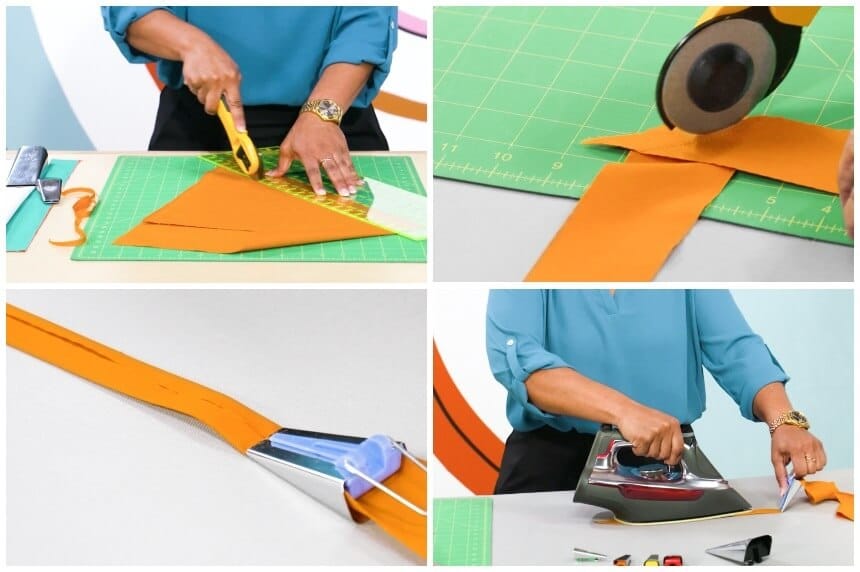
Step 1: cut bias strips as highlighted above. Make sure their width is equivalent to the wider end of the bias tape maker and that they have a pointy edge to make it easy to push them through the maker.
Step 2: put the pointy end of the bias strip through the wide end of the bias maker till it gets to the smaller end.
Step 3: once the pointy end of the fabric sticks through the bias maker, pull it out slightly, just enough to confirm that it’s forming a bias tape.
Step 4: Set your iron to steam setting and press the bias tape. To make this process more efficient, pull the bias maker’s handle with one hand and then pull it gently from your iron. Use the other hand to simultaneously press the bias tape.
The pins are optional, but you can use them to hold the folded parts in place.
Bias tape is very flexible and has a variety of applications. Here are the top 5 uses
 If your project involves drawstring bags or simple pajama drawstrings, you’ll appreciate the effectiveness of bias tapes. The 2 main ways you can make bias tape drawstrings are;
The best part about using bias tape to make drawstrings is that you can use leftover scraps of fabric from your project so that they match the garment or bag.
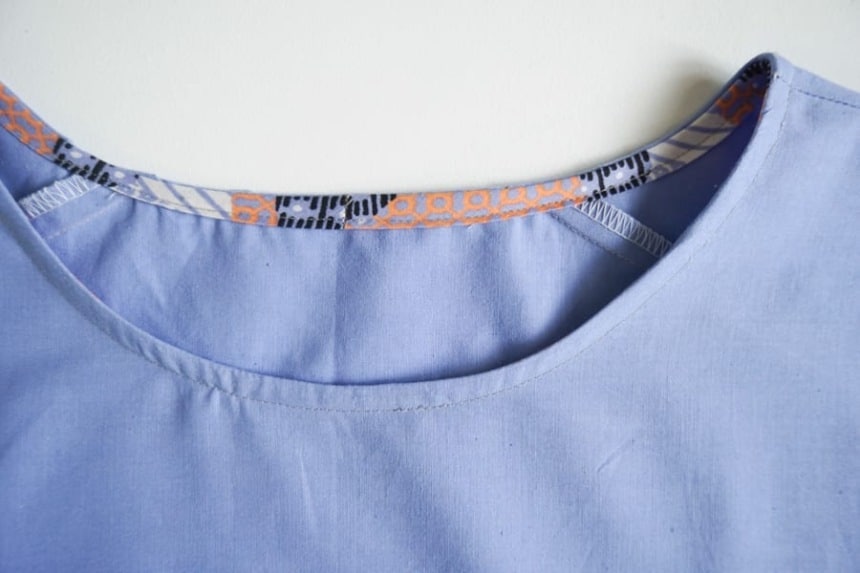 Raw edges can be unsightly, but you can use bias tape to encase them for a more polished look. Start by removing the seam allowance of your projects and then use a double-fold bias tape to edgestitch on the inner fold. Most commercial garment manufacturers use this type of bindings to eliminate the need for facings and linings. It’s also a cost-effective option for binding along the edges of armholes and necklines.
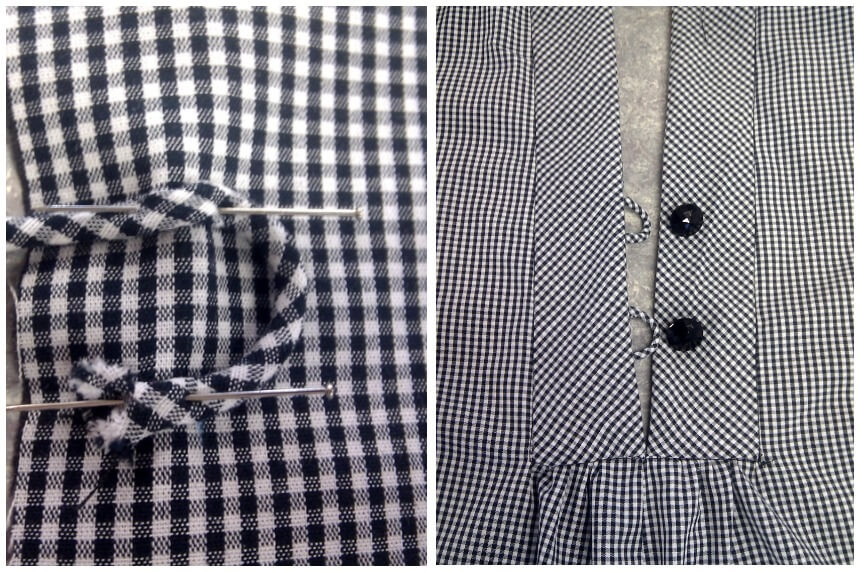 If your sewing machine can’t make buttonholes, you should consider button loops which you can easily make in 2 simple steps using bias tape. For this practice, you’ll need a double folded bias tape which you should edgestitch on the open side and cut into pieces based on the size of your buttons.
 You can use bias tape for encasing raw seam allowances to give garments a lovely finished look. This type of finish is mostly used on unlined clothes like skirts & jackets and mostly uses single-fold bias tape. It also works best on fabrics that are medium-weight. If you use bias tape for seam finishes, avoid using the same fabric as your garment but instead using contrasting colors for a more popping effect.
 This is the easiest application of bias tape and comes in handy if you’re making quilts or pillowcases. You simply stitch the bias tape to plain fabric based on your preferred pattern. It is easier if you go for straight lines as they are easy to sew, but you can also use them on curved patterns.
Some of the differences between single-fold and double-fold bias tape include:
In addition to single fold and double fold bias tapes, there are several variations of this sewing accessory. They include:
The other variations available are in different width sizes. For instance, some bias tapes come in very wide widths for quilt binding and blanket binding. There’s also a woven tape variation that is referred to as a twill tape. It’s stronger and thicker than other bias tapes.
If you decide to make the bias tapes yourself, you can customize them to suit the needs of your sewing project. Ready-made bias tapes are, however, available in various sizes, but you’ll spend some time finding a fabric that matches your garments.
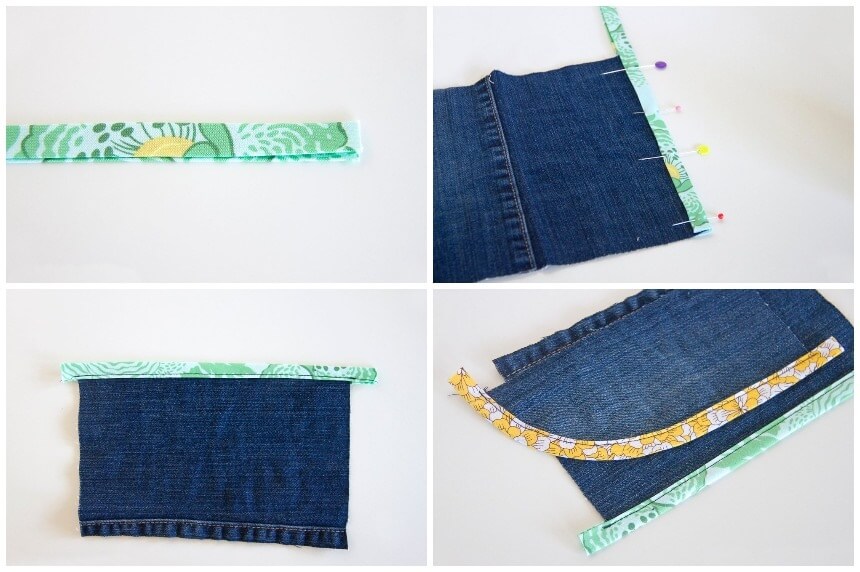
Step 1: determine the amount of bias tape you’ll need for your project. Make sure you account for the overlap that encases the bias tape.
Step 2: press open one of the folded sides of the bias tape and fold one of the raw edges of the tape into a triangle.
Step 3: pin the raw edges of the bias strip to the raw edges of your garment, all the way until you get back to the folded triangle.
Step 4: overlap the strip of the bias tape by about 1 inch.
Step 5: cut off the excess strip and sew the bias tape to the garment.
Sewing has become so popular that there are shows dedicated to this activity Trusted Source Scottish medical student is Sewing Bee's youngest winner A medical student from Glasgow has stitched up the title of Britain’s best amateur sewer. Serena Baker was crowned the 2021 winner of the Great British Sewing Bee after impressing the judges over eight weeks with numerous flawless garments. www.bbc.com . Bias tape is a handy sewing accessory and gives your garments a perfect finish. You can either make it yourself or buy ready-made tapes, depending on your project requirements. The above guide will help you create bias tapes from scratch and help you attach them to your fabric.