Bias binding is like basic binding’s little cousin. It gets its queer name from the way binding cloth is cut. There are three main ways of cutting cloth: lengthwise, crosswise and bias. Essentially, bias binding is a long and narrow piece of fabric that is pre-folded in various places. It covers the raw edges of a garment protecting it from damage. It also makes a piece of cloth or garment more interesting.
You can sew bas binding to a garment in 2 ways: a single fold that makes the binding appear on one side of the fabric’s edge or a double fold that makes half of the binding appear on both sides of the fabric’s edge. You can choose to buy pre-made bias binding and easily sew them onto your garments or you can simply make your own. Let’s delve deeper into bias binding and how to make one.
 Bias binding is a long narrow strip of fabric cut on the bias and pre-folded in different places. As it is cut on the bias, the strip’s fibers are at 45 degrees to the length making it stretchier, more fluid and more drapeable than fabric cut on the grain. This makes bias binding the ideal binding for necklines, curved hems and armholes.
Making bias binding is fast, and low-waste. You can make one with what you have in hand at home. All you’d need is a few items from your sewing kit, nothing fancy. The commercially made bias binding come in standard widths ranging from ½ inch to 5 ½ inches. If you make the binding yourself, you can make any width you want.
There are 2 ways of making bias binding: single bias and double bias. With single bias binding the sides of the binding are folded to the middle and pressed. Double bias is simply single bias folded over again and pressed.
Bias binding has a couple of uses including; binding quilts, binding wallets and purse edges, dressmaking and lots of other crafts projects. It can also be used for decoration especially with picot edging.
Bias binding is a scrap-buster and that’s what makes it interesting. You don’t need to go shopping for stuff to make bias binding. With tools from your regular sewing tool kit, you can give new life to the tiny pieces of fabric that you had intended to throw away.
Also, there aren’t any rules with the craft when it comes to style. If anything, mismatched bias binding is looks great and is fun to have.
For the best results, go for a natural fiber that presses flat easily like linen, cotton and cotton blends. The fabric should be a bit lighter in weight than the main fabric you have used to make your garment or quilt. Some of the most common lightweight materials that you can get for bias binding are like viscose, cotton lawn, and cotton double gauze.
Buying prefolded bias binding is much easier but making your own is fun and you get it exactly as you want it. There are two main ways of making your own bias binding:
Single length method: This is the best method if you only need a small section or you have some left-over fabric that you can use instead of cutting into a larger section of fabric.
The continuous loop: This is perfect if you have plenty of left-over fabric and you want to make a lot of binding for future projects.
Before making bias binding, you need to decide where it’s going to go and how wide it should be. For instance, if you are making a purse and you want the binding to be visible, then you ought to do double binding. On the contrary, if you are facing the neck of a dress then you want the binding to be hidden, thus you need to go for single binding.
To get everything right, measure the width of where you want the binding on your garment then multiply it by 4. Let’s say you want the finished edge to be ½ inch. The width of your bias cut will be 1 ½ inches.
Once you have worked out the length you can cut bias strips then join them.
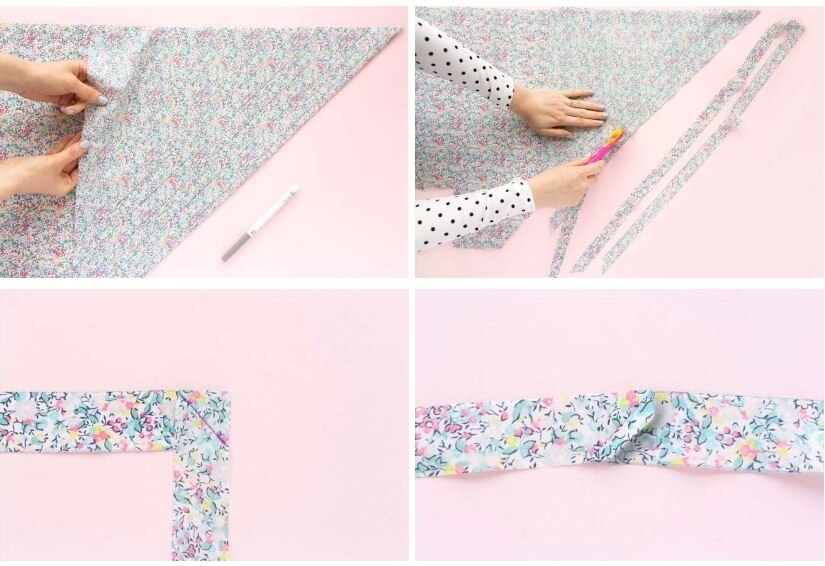 Step 1. Mark the bias line
Cut a rectangle from your fabric measuring about 55cm. cut the fabric along the selvedge by the fabric’s width. You can place a paper square along the selvedge for accuracy. Fold it diagonally to form a triangle then use a ruler and chalk or a heat erasable fabric marking pen to mark a line on the fabric. The line should follow the diagonal edge of the triangle.
According to expert reviewers, the Madam Sew Heat Erasable Fabric Marking Pens are the best fabric marking pens that money can buy out there. The 4 piece set comes with 4 refills for sewing, quilting and dressmaking. Unlike tailor’s chalk, the markers don’t rub away before you are done with your project.
Step 2. Mark and cut the bias strips
Here’s how to cut bias binding; draw more lines parallel to the bias line you worked in the step above. Cut out strips along these lines with a rotary cutter and a ruler then square off the strips’ ends.
Step 3. Join the strips
The last step is to join the strips to the length of binding you need. Place 2 strips with their rights sides facing each other at 90 degrees. Sew them together along the diagonal. You can use your hand or a sewing machine.
If you don’t have a sewing machine and are looking to get one, check out the popular Juki HZL-F600 Full Sized Computer Sewing and Quilting Machine. The machine will exceed your expectations when it comes to power and reliability with its advanced features. It is incredibly easy to operate and it comes in a multi-functional design meant for superior quilting and sewing projects. If you already have a sewing machine, you can just buy the bias binding foot Trusted Source How to Use the Adjustable Bias Binder Presser Foot– MadamSew If you have ever needed to bind yards of circle skirt hem or ruffles for a summer frock then you will understand what a godsend the bias binding foot is. Rather than sewing to the back of the fabric, then flipping and sewing your binding again to the front this nifty foot from Madam Sew halves your sewing effort and time! madamsew.com .
Once you are done sewing the 2 strips together, trim the seam allowance to about 3/8 inches then press the seam open. Repeat the process with all the strips to make the length of binding you need for your project.
Step 1. Create the basic shape
Cut out a square measuring 50cm from the fabric along the selvedge then mark a diagonal line across it. Cut along the line to get 2 triangles. Place the triangles on top of each other with the right sides. Ensure the 2 short edges match. You can offset them by 3/8 inches for a seam allowance. Stitch them together then open the seam. You should be having a rhomboid shape by now.
Step 2. Mark the bias strips
Turn the rhomboid shape wrong side up then grab your ruler and draw a line parallel o one of the longer diagonal edges. Make more lines on the fabric and if you end up with a narrower strip left over, trim it off. Press about 3/8 inches on the shorter diagonal edges to the wrong side for seam allowance.
Step 3. Bring the short edges together
Flip the fabric right side up then bring the shorter diagonal edges that you folded together. The lines you had marked on the fabric should line up vertically to form columns.
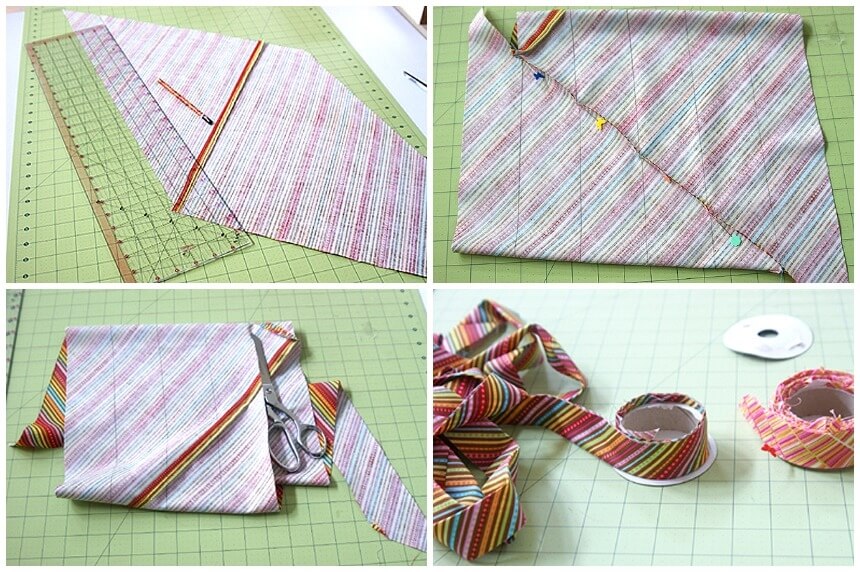 Step 4. Align the strips
Ensure the lines on the seam allowances match up well by moving one pressed edge along by one column.
Step 5. Stitch the edges together and press
Pin the pressed edges together then stitch them together along their pressed folds. Be sure to leave a 3/8 inch allowance then press the seam open.
Step 6. Cut the strip
Cut along your marked lines with a sharp pair of scissors. You should produce a long spiral bias tape that you can use to make the binding.
Once you have cut the strips with either method, you can go ahead and use a bias binding maker to turn it into a single fold bias binding. Bias binding makers come in different widths, you can find one that suits your needs.
Lay the bias strip you just made wrong side up on an ironing board or the surface you use for ironing. Insert one end of the strip into the wide end of binding maker. You can use a small pair of scissors to give it a push. Once inserted through successfully, move along the strip with your hot iron. Pull the binding maker and follow it with the iron.
The side edges of the strip will be creased to produce binding that is ready to use. If you intend to store the binding for future use, wrap it around something to help keep its pressed folds in place.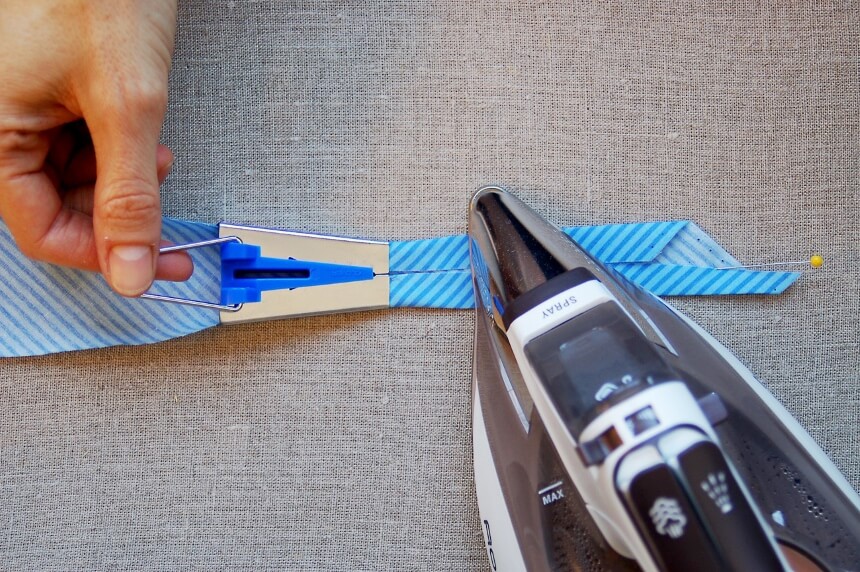
The seam binding vs. bias tape debate has been going on for a while because people have trouble differentiating the two. Bias tape is used to bind (conceal or cover) the raw edges of a garment while seam binding is used to stabilize an area on your garment that is likely to go through a lot of stress like a skirt pleat.
There are various ways of attaching bias binding. You should choose a method based on the desired finish of your garment and whether you want the binding hidden or visible. Here Trusted Source Bias Binding Tutorial | Blog | Oliver + S Here’s a tutorial for my favorite method of sewing bias binding so the binding looks nice on both sides of your project. oliverands.com is more detailed information on how to sew bias binding.
It is no doubt that binding improves the overall look of a garment. Bias binding is one of the simplest, fastest and neatest forms of binding. You don’t need much for the process other than the contents of your basic quilting kit and a sewing machine. Bias binding is very straightforward, you would never think of buying prefolded bias after your first attempt.
Our guide has all the ins and outs of making and sewing your own bias binding. Here is one last hint on attaching bias binding to a thick fabric like heavy wool; when stitching, ensure the first seam of the binding is a bit narrower than the first folded crease. You will end up with a little extra fabric that will enable the binding to wrap around the fabric’s thickness comfortably.